
Nästan utan innehåll
Författararkiv: Bo Peterson
Archiving and moving Gmail with AppleScript on Mavericks and Yosemite
The latest public version of the mail client in OS X 10.9 Mavericks has some issues working together with Gmail, especially when it comes to automating tasks with AppleScript. Some blame Apple for this, some blame the Gmail non-standard way of handling imap folders. My take is that Gmail’s filosophy of labels instead of folders is good, and that the mail app does a pretty good job of handling both traditional imap servers and non traditional like Gmail. However, when it comes to scripting, the problems begin. In previous versions of OS X, Gmail could be archived with the following AppleScript:
[plain]
move message to mailbox "[Gmail]/All Mail" of account "Gmail"
[/plain]
In recent versions of the mail app, the mail is copied, not moved. This is covered in more detail in the article Making Apple Mail, Gmail, IMAP and AppleScript work together. The solution proposed in the article is to turn off ”Show in IMAP” for ”All Mail” in Gmail settings, but then some of the good features of Gmail labels get lost.
I suggest an alternative solution for using AppleScript to move Gmail-messages, where the original Gmail settings can be kept. One technique can be used to move mail to the archive folder, the other technique can move to any folder.
- The trick to move to the archive folder is to let the AppleScript invoke the Menu command Message -> Archive (ctrl-cmd-A).
- To move to any folder, a rule must be added that moves the mail, and then the AppleScript triggers the Menu command Message -> Apply rules (option-cmd-L)
Here is the script for technique 1, that archives (moves to Gmail/All mail) mail in the inbox that is read:
[plain]
on run {input, parameters}
tell application "System Events"
if process "Mail" is frontmost then
tell application "Mail" to activate
tell application "Mail"
–archive read mail in inbox
set readGmailMessages to every message of mailbox "INBOX" of account "Gmail" whose read status is true
–select inbox
tell application "System Events"
tell process "Mail"
–here we go to Favorite mailbox 1
keystroke "1" using command down
delay 0.5
end tell
end tell
–mark all read Gmail messages
tell front message viewer to set selected messages to readGmailMessages
delay 0.5
–archive all read Gmail messages
tell application "System Events"
tell process "Mail"
–here we invoke the Menu command Message->Archive
keystroke "a" using {control down, command down}
end tell
end tell
end tell –tell application "Mail"
end if
end tell
return input
end run
[/plain]
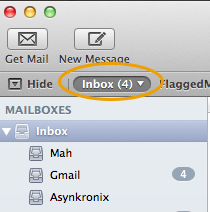
A requirement for this script to run is that the Inbox (the mail app inbox that may contain inboxes from different accounts) is favorite inbox number 1. If not, rearrange the top of the mail window until it looks like this:
This technique works only for archiving, but sometimes it is required to move to any IMAP folder (or mark with any label if you prefer that terminology). To do this, the first step is to define a rule that moves mail messages. Here is an example of a rule that moves mail from the inbox to a folder named FlaggedGmail (but could be named anything). The folder/label must be created first.
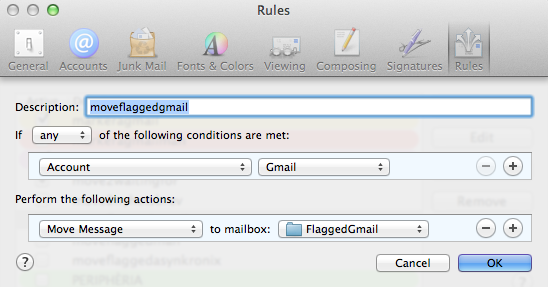
Make sure that the rule moveflaggedgmail is not checked:

Now everything is prepared for this script that takes all read mail that is also flagged and moves it to FlaggedGmail.
[plain]
(*
– This script requires a rule, normally disabled, named moveflaggedgmail
*)
on run {input, parameters}
tell application "System Events"
if process "Mail" is frontmost then
tell application "Mail" to activate
tell application "Mail"
–move all read flagged mail from inbox to FlaggedGmail
–Select inbox
tell application "System Events"
tell process "Mail"
keystroke "1" using command down
delay 0.5
end tell
end tell
set flaggedGmailMessages to every message of mailbox "INBOX" of account "Gmail" whose read status is true and flagged status is true
tell front message viewer to set selected messages to flaggedGmailMessages
delay 0.5
set enabled of rule "moveflaggedgmail" to true
delay 0.5
tell application "System Events"
tell process "Mail"
— Apply rules to selected messages
keystroke "l" using {command down, option down}
delay 0.5
end tell
end tell
set enabled of rule "moveflaggedgmail" to false
end tell –tell application "Mail"
end if
end tell
return input
end run
[/plain]
I put the scripts in Automator service workflows and trigger them through the Services menu. They only work if Mail is active. If you would like to run the scripts when Mail is not frontmost, just delete the line
[plain]
if process "Mail" is frontmost then
[/plain]
and the corresponding
[plain]
end if
[/plain]
Now let’s hope this will work for Yosemite as well! UPDATE: it works on Yosemite.
Internet of things with Arduino Yun and Yaler
 This tutorial will demonstrate how the Arduino Yun can be controlled from anywhere with any internet connected web browser. Controlling the Yun with a web browser connected to the same network, for example connected to the same wifi router as the Yun, is straight forward and well covered in the Arduino Yun bridge tutorial. However, a common problem in home automation and internet of things applications is that it is difficult to reach devices connected behind wifi routers from the outside. There are different approaches to overcome this problem:
- Port forwarding and static ip addresses. This solution requires the user of the connected device to know how to configure a router and have access to router administration which is not always possible. A Yun tutorial with port forwarding is found here.
- Polling is a technique where the connected device at regular intervals checks with an external server if the device should take action. This solution requires no configuration of the router but it creates extra network traffic and response delays.
- A third way is to use WebSockets which is a way of providing real time full-duplex communication over TCP. Spacebrew is a good open source toolkit for connected devices using WebSockets. Autobahn is another infrastructure that can be used.
- Reverse HTTP is the solution that will be used in this tutorial. We will use Yaler which is an open source relay infrastructure that gives access to connected devices with very little configuration.
Let’s get started.
Step 1: Download all the example code from GitHub
Step 2: Sign up for a yaler account at try.yaler.net and note your yaler relay domain.
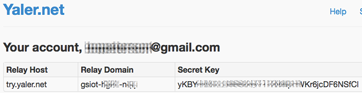
Add your relay domain on the second line of the Arduino sketch yunYaler.ino:
[cpp]
#define DEBUG false //NOTE: the serial monitor must be opened if debug is true
#define RELAYDOMAIN "your-relay-domain" //Change this to your relay domain, something like gsiot-zzzz-yyyy
[/cpp]
Step 3: Make sure that your computer and the Yun are connected to the same network. Instructions can be found at the Arduino website. Note: The Yun and the computer only has to be on the same network during configuration. As soon as the programs are uploaded to the Yun, they can be on completely different networks, which is the whole point with this tutorial.
Step 4: Start terminal on Mac or for example PuTTY on Windows. Change direcory to the folder where yunYaler.py is located on your computer with something like
[bash gutter="false"]cd /Users/username/some/folder/somewhere/[/bash]

Step 5: Copy the python program yunYaler.py to Yun with
[bash gutter="false"]scp -r ./yunYaler.py root@arduino.local:/usr/lib/python2.7/bridge[/bash]
and enter your arduino password when prompted.
Note: If you have changed the name of your Yun from the default name arduino, you will have to use root@yourYunName.local:/usr... instead. You can also use the ip-address of the Yun like this: root@http://192.168.1.96:/usr...

Step 6: Upload yunYaler.ino to the Arduino. Make sure you have changed the RELAYDOMAIN definition to your domain first. Also set the DEBUG definition to either true or false. true requires the serial monitor to be opened for the sketch to run. Debug messages will then be printed to the serial monitor.
The arduino sketch opens a pyhon script yunYaler.py that does the actual communication with the Yaler relay. The python script is launched by the runYaler-function in yunYaler.ino:
[cpp]
void runYaler() {
  p.begin("python");
  p.addParameter("yunYaler.py");
  p.addParameter("try.yaler.net");
  p.addParameter(RELAYDOMAIN);
  p.addParameter("bridge"); //enable bridge mode
  p.runAsynchronously(); //makes it possible for the arduino to do other things while waiting for yaler request
}
[/cpp]
runAsynchronously makes the python script and arduino sketch run independently from each other, and makes it possible for the arduino to do other things while it is waiting for a yaler request. Yun Bridge is used for communication between the arduino sketch and the python script. A very good introduction to Yun Bridge is covered in the blog Adventures with Arduino Yun. If, for example, a led on pin 13 should be turned on, a REST command is sent to Yun from any web browser:
http://try.yaler.net/your-relay-domain/arduino/digital/13/1
The python script parses out the part of the url after /arduino and sends to the arduino sketch through the bridge with value.put('rest',rest):
[python]
if acceptable and (x[0] == '1') and (x[1] == '0') and (x[2] == '1'):
    keepGoing, requestUrl = getStringBeforePattern(' HTTP/1.1', s)
    pos=requestUrl.lower().find('/arduino')
    if pos!=-1:
        rest=requestUrl.lower()[pos+8:]
        if usebridge:
            value.put('rest',rest)
            now=time.strftime('%H:%M:%S', time.localtime())
            value.put('time',now)
            putStatus=True
[/python]
The arduino sketch checks periodically if the bridge is updated, and reads the rest command if it is updated:
[cpp]
    Bridge.get("rest", frompython, 32);
    String rest=String(frompython);
    Bridge.get("time", frompython, 32);
    String time=String(frompython);

    if (lastTime!=time) {
      lastTime=time;
      process(rest,time);
    }
[/cpp]
If there is a new rest command, the function process is called that tries to find a valid command and act accordingly:
[cpp]
void process(String rest, String time) {
  // read the command
  String command = head(rest);
  rest=tail(rest);
  // is "digital" command?
  if (command == "digital") {
    digitalCommand(rest);
  }
  // is "analog" command?
  else if (command == "analog") {
    analogCommand(rest);
  }
  // is "mode" command?
  else if (command == "mode") {
    modeCommand(rest);
  }
  else {
    String answer="{\"command\":\"unsupported\",\"action\":\"unsupported\"}";
    Bridge.put("answer",answer);
  }
}
[/cpp]
Step 7: Now that both the Arduino sketch and the Python script are uploaded, all is set and it is time to test it. After power up, it might take more than one minute before the Yun has booted and the wifi connection is established. It is important that the wifi connection is established before the Arduino sketch starts the Python process. To ensure this there is a 2 minute delay when Led 13 will blink before it is ready.
Note 1: Led 13 will blink fast (twice a second) for 1 minute, stop blinkning for
some seconds and start blinking slow (once a second) for another minute
Note 2: if DEBUG is true there will be no delay. Instead led 13 will blink very fast
until the serial monitor is opened. As soon as the serial monitor is opened, the led will stop blinking and it is ready. The Yun must be connected to the computer with a usb cable for this to work.
Note 3: If you forgot to change your-relay-domain to your domain in the Arduino sketch, Led 13 will be solid on (no blink)
Step 8: Just enter the following URL-s in any web browser to read or write data. Be sure to change your-relay-domain to your yaler relay domain:
- set D13 to HIGH (turn built in led on) with
http://try.yaler.net/your-relay-domain/arduino/digital/13/1 - set D13 to LOW (turn built in led off) with
http://try.yaler.net/your-relay-domain/arduino/digital/13/0 - read D13 state with
http://try.yaler.net/your-relay-domain/arduino/digital/13 - read analog input A4 with
http://try.yaler.net/your-relay-domain/arduino/analog/4
The response to the above commands will be in json format:
{"command":"digital","pin":13,"value":1,"action":"write"}{"command":"digital","pin":13,"value":0,"action":"write"}{"command":"digital","pin":13,"value":0,"action":"read"}{"command":"analog","pin":4,"value":679,"action":"read"}
The structure for the rest is as follows:
http://try.yaler.net/your-yaler-domain/arduino/command/pin to read data or
http://try.yaler.net/your-yaler-domain/arduino/command/pin/value to write data
command can be either digital or analog, pin can be 0..13 for digital and 0..5 for analog. value can be 0..1 for digital.
Enjoy turning on and off an LED from remote!
Complete arduino and python code
UPDATE: Please note that some stability issues have been reported with the original version of yunYaler.py. An updated version with added time out is available at GitHub.
yunYaler.ino
[cpp]
#define DEBUG false //NOTE: the serial monitor must be opened if debug is true
#define RELAYDOMAIN "your-relay-domain" //Change this to your relay domain

/*
This sketch makes it possible to control the digital outputs of the Yun connected to
a network without having to know the Yun IP number or having to do any
port forwarding settings on the router the yun is connected to.
This is possible by using the yaler service (try.yaler.net)

As a bonus you can also read the analog inputs
*/
#include <Process.h>

String compiletime=__TIME__;
String compiledate=__DATE__;
String file=__FILE__;

Process p;		// Create a process and call it "p"

const int ledPin =  13;      // the number of the on board LED pin

unsigned long previousMillis = 0;        // will store last time bridge data was checked
unsigned long now;
const long interval = 200;           // interval at which to check updated bridge data

char frompython[33]; //data read from bridge that was put by python.
// temporary storage before it is compied to a string. Allocate
// space for a 32 character long rest command

String lastTime; //time when data was read from the bridge

void setup() {
  lastTime="99:99:99";
  // set the digital pin as output:
  pinMode(ledPin, OUTPUT);

  unsigned long pause;
  if (DEBUG) {
    pause=0UL;
  } else {
    pause=60UL*1000UL;
  }

  now=millis();

  //wait for the wlan to get established and everything else to start
  //fast blink
  while((millis()-now)<pause) {
    digitalWrite(ledPin,1-digitalRead(ledPin));
    delay(250);
  }

  frompython[0]='-';
  frompython[1]='\0';

  // Initialize Bridge
  Bridge.begin();

  now=millis();
  //wait a little more for the wlan to get established
  //slow blink
  while((millis()-now)<pause) {
    digitalWrite(ledPin,1-digitalRead(ledPin));
    delay(500);
  }

  if (DEBUG) {
    //this requires a serial cable between arduino and computer.
    Serial.begin(9600);
    delay(25);
    // Wait until serial is opened. Blink fast while doing so
    digitalWrite(ledPin,LOW);
    while (!Serial) {
      digitalWrite(ledPin,1-digitalRead(ledPin));
      delay(25);
    }
    digitalWrite(ledPin,LOW);
  }

  printdebug(compiletime);
  printdebug(compiledate);
  printdebug(file);
  runYaler(); //start the yaler pyton process
}

void loop() {

  now = millis();

  if(now - previousMillis >= interval) {
    previousMillis = now;

    //get the rest data from python
    Bridge.get("rest", frompython, 32);
    String rest=String(frompython);
    Bridge.get("time", frompython, 32);
    String time=String(frompython);

    if (lastTime!=time) {
      lastTime=time;
      process(rest,time);
    }
  }
}

void runYaler() {
  p.begin("python");
  p.addParameter("yunYaler.py");
  p.addParameter("try.yaler.net");
  p.addParameter(RELAYDOMAIN);
  p.addParameter("bridge"); //enable bridge mode
  p.runAsynchronously(); //makes it possible for the arduino to do other things while waiting for yaler request
}

void process(String rest, String time) {
  printdebug("----------");
  String temp="Processing ["+rest+"] at "+time;
  printdebug(temp);
  // read the command
  String command = head(rest);
  rest=tail(rest);
  // is "digital" command?
  if (command == "digital") {
    digitalCommand(rest);
  }
  // is "analog" command?
  else if (command == "analog") {
    analogCommand(rest);
  }
  // is "mode" command?
  else if (command == "mode") {
    modeCommand(rest);
  }
  else {
    String answer="{\"command\":\"unsupported\",\"action\":\"unsupported\"}";
    Bridge.put("answer",answer);
  }
}

void digitalCommand(String rest) {

  int pin, value;

  //parse pin number from rest string
  pin=headNumber(rest);
  rest=tail(rest); //the part of the rest following the number

  //parse value from rest string
  value=headNumber(rest);
  rest=tail(rest);

  printdebug("digital command pin: "+String(pin)+", value: "+String(value));

  if (pin!=-1 && value!=-1) {
    digitalWrite(pin,value);
    String answer="{\"command\":\"digital\",\"pin\":"+String(pin)+",\"value\":"+String(value)+",\"action\":\"write\"}";
    Bridge.put("answer",answer);
  } else if (pin!=-1 && value==-1) {
    value=digitalRead(pin);
    String answer="{\"command\":\"digital\",\"pin\":"+String(pin)+",\"value\":"+String(value)+",\"action\":\"read\"}";
    Bridge.put("answer",answer);
  } else {
    String answer="{\"command\":\"digital\",\"action\":\"unsupported\"}";
    Bridge.put("answer",answer);
   }
}

void analogCommand(String rest) {

  int pin, value;

  //parse pin number from rest string
  pin=headNumber(rest);
  rest=tail(rest); //the part of the rest following the number

  if (pin!=-1) {
    value=analogRead(pin);
    String answer="{\"command\":\"analog\",\"pin\":"+String(pin)+",\"value\":"+String(value)+",\"action\":\"read\"}";
    Bridge.put("answer",answer);
  } else {
    String answer="{\"command\":\"analog\",\"action\":\"unsupported\"}";
    Bridge.put("answer",answer);
   }
}

void modeCommand(String rest) {
  //not implemented yet. Needed if you want to change digital pins between input and output
    String answer="{\"command\":\"mode\",\"action\":\"unsupported\"}";
    Bridge.put("answer",answer);
}

int headNumber(String s) {
  int number;
  String numberString=head(s);
  if (numberString.length()>0) {
    number=numberString.toInt();
  } else {
    number=-1;
  }
  return number;
}

String head(String s) {
  //returns text after leading slash until next slash
  return s.substring(1,s.indexOf("/",1));
}

String tail(String s) {
  //returns text after second slash (if first char is a slash)
  return s.substring(s.indexOf("/",1),s.length());
}

void printdebug(String s) {
  if (DEBUG) {
    Serial.print(s);
    Serial.println(char(194));
  }
}
[/cpp]
yunYaler.py
[python]
# Copyright (c) 2011, Yaler GmbH, Switzerland
# All rights reserved
# based on TimeService.py by Yaler GmbH
# modified for Arduino Yun by Bo Peterson www.asynkronix.se
# note: this version sometimes freezes on unstable networks.
# An updated version with added time out is available at
# https://github.com/bopeterson/yunYaler

import sys
import time
import socket

sys.path.insert(0, '/usr/lib/python2.7/bridge/')

from bridgeclient import BridgeClient as bridgeclient

value = bridgeclient()

def find (pattern, s):
	x = [0] * len(pattern)
	i = j = t = 0
	while True:
		k = 0
		match = True
		while (k != len(pattern)) and match:
			if i + k == j:
				x[j % len(x)] = s.recv(1)
				j += 1
			t = x[(i + k) % len(x)]
			match = pattern[k] == t
			k += 1
		i += 1
		if match or (t == ''):
			break
	return match

def getStringBeforePattern (pattern, s):
	beforePattern=''
	x = [0] * len(pattern)
	i = j = t = 0
	while True:
		k = 0
		match = True
		while (k != len(pattern)) and match:
			if i + k == j:
				c=s.recv(1)
				beforePattern += c
				x[j % len(x)] = c
				j += 1
			t = x[(i + k) % len(x)]
			match = pattern[k] == t
			k += 1
		i += 1
		if match or (t == ''):
			break
	if match:
		beforePattern=beforePattern[:(len(beforePattern)-len(pattern))]

	return match,beforePattern

def location(s):
	host = ''
	port = 80
	if find('\r\nLocation: http://', s):
		x = s.recv(1)
		while (x != '') and (x != ':') and (x != '/'):
			host += x
			x = s.recv(1)
		if x == ':':
			port = 0
			x = s.recv(1)
			while (x != '') and (x != '/'):
				port = 10 * port + ord(x) - ord('0')
				x = s.recv(1)
	return host, port

def accept(host, port, id, usebridge):
	rest='{"command":"unsupported","action":"unsupported"}' # if /arduino not found in url
	putStatus=False
	x = [0] * 3
	while True:

		s = socket.socket(socket.AF_INET, socket.SOCK_STREAM)
		s.connect((host, port))
		while True:

			s.send(
				'POST /' + id + ' HTTP/1.1\r\n'
				'Upgrade: PTTH/1.0\r\n'
				'Connection: Upgrade\r\n'
				'Host: ' + host + '\r\n\r\n')
			j = 0
			while j != 12:
				x[j % 3] = s.recv(1)
				j += 1
			if (x[0] == '3') and (x[1] == '0') and (x[2] == '7'):
				host, port = location(s)
			acceptable = find('\r\n\r\n', s)
			#find the calling url and parse it
			if acceptable and (x[0] == '1') and (x[1] == '0') and (x[2] == '1'):
				keepGoing, requestUrl = getStringBeforePattern(' HTTP/1.1', s)
				pos=requestUrl.lower().find('/arduino')
				if pos!=-1:
					rest=requestUrl.lower()[pos+8:]
					if usebridge:
						value.put('rest',rest)
						now=time.strftime('%H:%M:%S', time.localtime())
						value.put('time',now)
						putStatus=True
					else:
						print rest

			if not acceptable or (x[0] != '2') or (x[1] != '0') or (x[2] != '4'):
				break

		if not acceptable or (x[0] != '1') or (x[1] != '0') or (x[2] != '1'):
			s.close()
			s = None

		if not acceptable or (x[0] != '3') or (x[1] != '0') or (x[2] != '7'):
			break

	return s, rest, putStatus

usebridge=False
if len(sys.argv)>3:
	if sys.argv[3]=='bridge':
		usebridge=True

while True:

	s,rest,putStatus = accept(sys.argv[1], 80, sys.argv[2],usebridge)
	time.sleep(0.3) # this should be about 50% longer than interval in arduino sketch
	if putStatus:
		reply=value.get('answer')
	else:
		reply=rest # url must contain /arduino
	s.send(
		'HTTP/1.1 200 OK\r\n'
		'Connection: close\r\n'
		'Content-Length: '+str(len(reply))+'\r\n\r\n' + reply)
	time.sleep(0.001)

	s.close()
[/python]
[facebook_like_button]
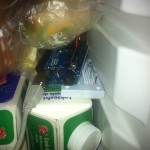
My Arduino controlled fridge
-
- Taking out broken thermostat
-
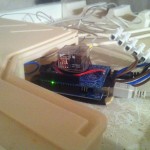
- Arduino with relay shield
-
- Testing the LM335 inside the fridge
-
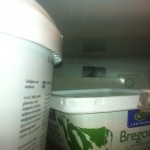
- The temperature sensor behind the cooling element
-

- USB cable sticking out where temp knob used to be
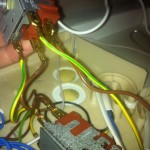
A while ago the fridge thermostat of my combined fridge and freezer broke. I didn’t want to buy a new fridge, so I checked the price of a new thermostat. The price was about 700 Swedish kronor, or 100 USD. As I already had a 30$ Arduino and a 2$ relay lying around, I thought: why not give it a try? So I started with a quick and dirty fix, disconnected the thermostat and connected the Arduino and the relay to the fridge compressor. I made a very simple timer based Arduino sketch that turned the compressor on for 5 minutes and off for 20 minutes. This worked really well and the fridge was up and running in no time. Of course the temperature was not very constant, especially when the door was opened and closed a lot (something that happens when a teenager in the family consumes huge amounts of milk). To solve this I had to add a temperature sensor, and I also happened to have a LM335 sensor lying around. I adjusted the Arduino sketch, added the LM335, and now the fridge has been running as solid as rock for 4 months. I built the relay shield myself, but as it controls high currents and high voltage I recommend you buy it. You can for example get one from Robotshop.
Here is the code (I got a lot of inspiration from spacetinkerer):
[cpp]
//fridgeWithLM335
int t;
int relayPin = 4;
int ledPin = 13;
float tk;
float tc;
float tcset;
float tcdelta;
int relayState;
void setup() {
tcset=6.0;
tcdelta=1.5; // 4.14–7.55
pinMode(relayPin, OUTPUT);
pinMode(ledPin, OUTPUT);
turnCompressorOn();
}
void loop() {
t=analogRead(0);
tk = t * 0.004882812 * 100;
tc = tk – 2.5 – 273.15;
if (tc>(tcset+tcdelta) && isCompressorOff()){
turnCompressorOn();
} else if (tc<(tcset-tcdelta) && isCompressorOn()){
turnCompressorOff();
}
delay(30*1000);
}
void turnCompressorOn(){
relayState=LOW;
digitalWrite(relayPin,relayState);
digitalWrite(ledPin,!relayState);
}
void turnCompressorOff(){
relayState=HIGH;
digitalWrite(relayPin,relayState);
digitalWrite(ledPin,!relayState);
}
boolean isCompressorOff(){
return (relayState==HIGH);
}
boolean isCompressorOn(){
return !isCompressorOff();
}
[/cpp]
[facebook_like_button]